arrow-downburgerchev-downclosedepartmentdownloadglobeloaderlocationloginmagnifiersearchuser facebooklinkedintwitterxingyoutube atbechczdeesfrgbhuieitnlplsk

The My Mercateo account

When you order from Mercateo, you automatically have access to a My Mercateo account. Your account consists of the following components:

Shopping lists - Here you can create, modify and delete purchase lists. Purchase lists are useful for items that you buy regularly. This way you do not have to search for the same items again on your next visit, but you can simply order them from your shopping list. If your company uses the Multi User feature, shopping lists can also be activated for other users in your purchasing hierarchy.

Order archive - Here you will find an overview of all your orders and PDF invoices. You can view every order in detail, book the goods receipt, place repeat orders, submit return/reclamation requests, and export your order archive as an Excel file to analyse it by product groups, cost centres and buyers.

Cost centres/types - Here you can add cost centres and types and assign them to other users. On the preview page of an order, these cost centres and types can be assigned to specific items. This allows you to specify your Mercateo invoices, so that they can immediately be processed by your accounts department

Settings - Here you can specify permissions for other users in the purchase hierarchy, such as whether or not you want to make it mandatory to add cost centres, cost types and purchase order numbers.

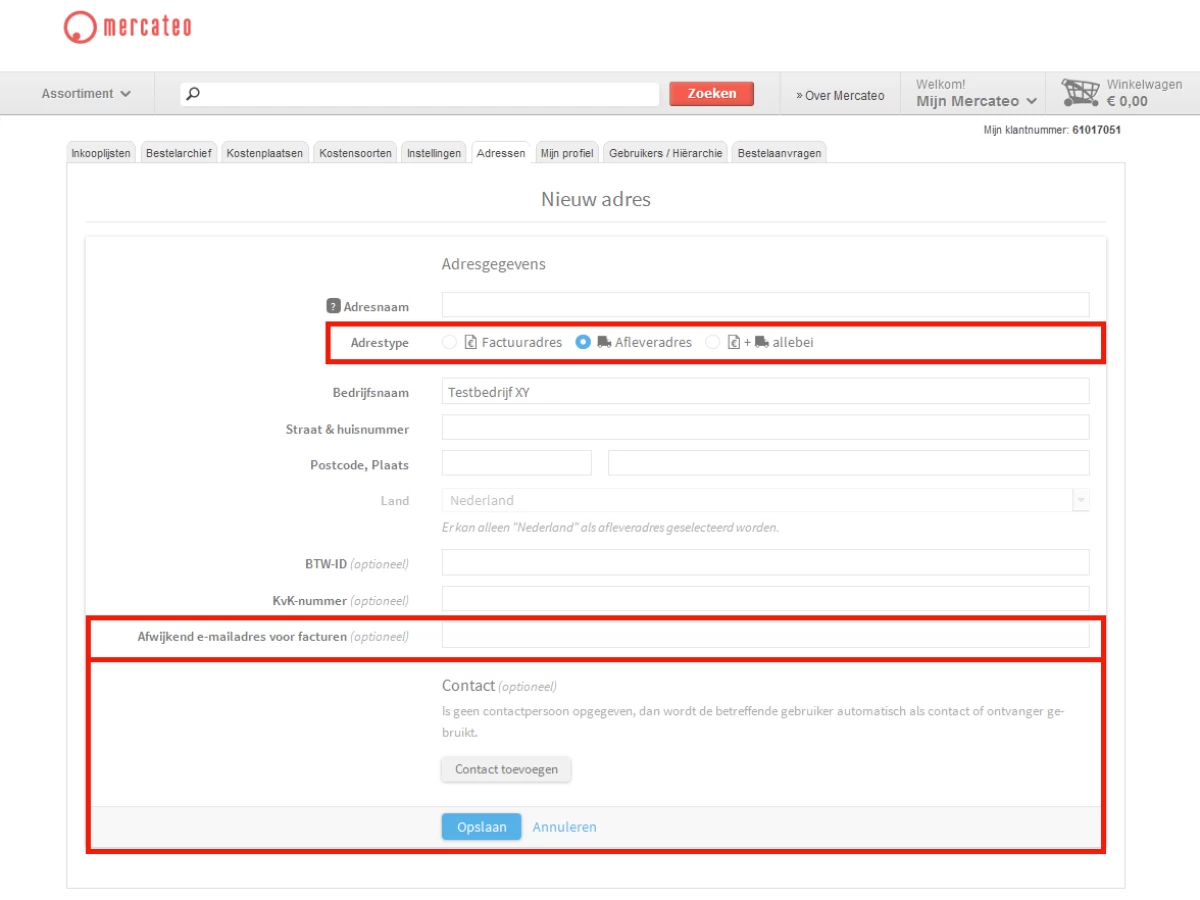
Addresses - Here you will find an overview of your company data (invoice and delivery addresses). You can add new addresses and change existing addresses if you are authorized to do so by the administrator of the company account.

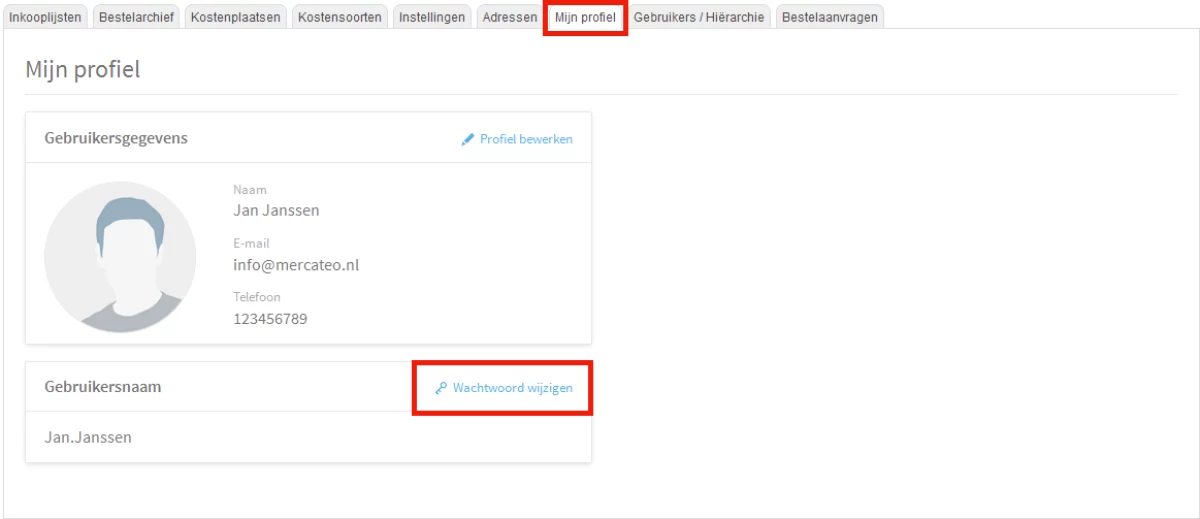
My profile - Your profile consists of your name, username, email address and phone number. Here you can change your profile, change your password and select who will be your replacement for receiving and responding to order requests in case of absence.

Users / Hierarchy - Here you can see the users who are placed below you in the purchasing hierarchy. A purchasing hierarchy is easy to implement for all departments in your organisation. This allows employees to purchase goods efficiently from Mercateo. In addition, all orders are bundled under one customer number. Orders are either automatically approved according to your approval settings, or sent by e-mail to the right person who can approve, reject or change them with a single click.

Purchase requests - Here you can see purchase requests that have to be approved by you, or that are waiting for approval by another user lower down in the purchasing hierarchy.

Create account - Only business customers can register with Mercateo, i.e. entrepreneurs, freelancers and corporations. To create an account, go to mercateo.nl, click on ‘My Mercateo’ and then on 'Register now'. You will be automatically redirected to the registration page. Fill in all the required fields and click on ‘Register now’. You will then receive a confirmation email with your customer number and password.

Delete account - Please contact our customer service if you wish to delete your My Mercateo account. Please note that your data, such as purchase lists and your order archive, will be lost and cannot be restored. We would appreciate it if you could tell us the reason for unsubscribing so we can continue to improve our services.

Log on to My Mercateo and go to the tab 'Profile' to view your personal information.

Edit profile - Click on 'Edit profile' to change your title, name, email address or telephone number. Click ‘Save’ after making changes.

Change password - Click on 'Change password' to change your password. Enter your old and new password on the next page and click ‘Save.

Activating / ending replacement management - In case of illness or extended leave, you can add a representative who can handle/approve purchase requests in your place. To do so, click on 'Set up absence management’ and select the desired user. The selected representative will be informed about new tasks automatically.

You can remove a replacement by clicking on 'End absence management'. The user will not be informed by the system.

Login - Go to mercateo.nl, click on My Mercateo and then click ‘Login’. You will automatically be redirected to the login page. Enter your username and password, and click ‘Login’ again. You now have access to your personal Mercateo account.

Login failed? - Make sure your username and password are entered correctly. If you are still unable to log in or have forgotten your login details, please click 'Forgot login', and enter your email address on the next page. Click 'Submit' and you will receive an email with your username and a link to reset your password.

Logout - Go to mercateo.nl, click on My Mercateo and then click ‘Logout’. If you cannot log out, please try deleting cookies (see internet options). If this still doesn’t work, please contact our customer service.

Log on to My Mercateo and select the tab 'My profile' to view your personal information. Click on 'Change password' and enter your old and new password on the next page. Then click ‘Save’. Your password has now been changed.

Manage settings and users

Adding/changing addresses - If you are the administrator of the company account, or if you have been authorised to do so, you can create and change invoice and delivery addresses. To add a new address, log on to My Mercateo, go to the tab 'Addresses' and click 'New address'.

If you would like to edit an existing address, click on the three blue dots. If your billing address is different from your delivery address, you can enter two different address and specify them as your invoice or delivery address under 'Address type'. Check your address details carefully and click on 'Save' after making any changes.

Different address for invoices - If you have a central email address for receiving invoices (e.g. your accounting department), enter this email address under ‘Different email address for accounting’. If you leave this field blank, invoices and payment reminders will be sent to the user/buyer. For every address, a different email address can be entered for invoices.

Specify contact person - You can optionally specify a contact person for each address. If no contact person is specified, the current user will automatically become the consignee and contact.

Assign addresses to users - Go to the tab 'Addresses', and click on the three blue dots behind an existing address. Select 'Assign' and specify which users can use the address.

Add cost centres/types - Log on to My Mercateo and select the tabs 'Cost centres' and/or 'Cost types' to add/delete cost centres/types, or to assign them to users. If you would like to add a large number of cost centres/types, you can also upload them via a text file (*.txt) or an Excel file (*.xls). Enter one cost centre per line in the file and use up to 50 characters per line.

Assign users to cost centres/types - Click on the three blue dots next to the relevant cost centre / type and choose ‘Assign’. You can now select which user can use this cost centre / type.

Making cost centres/types mandatory - Log on to My Mercateo and select the tab 'Settings'. Tick the box 'Cost centres are mandatory with each order' and/or 'Cost types are mandatory with each order' and click 'Save'.

Making purchase order numbers mandatory - To make purchase order numbers mandatory for all orders and users, log on to My Mercateo and select the tab 'Settings’. Tick the box 'Purchase order numbers are mandatory' and click 'Save'.

Adding purchase order numbers to an order - On the preview page of your order, you can add an internal purchase order number as a reference. Go to 'Optional information', add your purchase order number and click 'Submit order'. The number you entered can be found in all related communications, on the invoice and in your order archive.

Log on to My Mercateo and select the tab 'Shopping list'. Here you can create, modify and delete shopping lists, and add items from your shopping lists directly to the shopping basket. If you are the main administrator of the company account, you can also share your shopping lists with all other users in your purchasing hierarchy.

Log on to My Mercateo and select the tab 'Users'. Here you can see which users are ranked below you in the purchasing hierarchy.

Add employee - Click 'New employee' to add a new user. Enter the details on the next page and click 'Save'. The user will receive all access data by email and will be placed directly under you in the purchasing hierarchy.

Delete employee - To delete a user, click on the three blue dots behind the username and select 'Delete'. If you confirm this choice, the user will no longer have access to your company account. Users who are placed under the deleted user in your purchasing hierarchy wil be automatically assigned to the next highest ranking user.

Manage purchasing hierarchy - Click on 'Hierarchy' in the upper right corner to manage your purchasing hierarchy. Now drag and drop the user to the desired position or click on the user name and select a new approver.

Assign addresses - Click on the three blue dots behind a username and select 'Administrate'. In the sub tab 'Addresses' you can define which invoice and delivery addresses can be used by the selected employee . If you would like to appoint addresses to multiple users at once, open the main tab 'Addresses' and click on the three blue dots behind the address. Select ‘Assign’ and add the desired users.

Assign cost centres/types - Click on the three blue dots behind a username and select 'Administrate'. In the sub tab 'Account assignment' you can define which cost centres and cost types the selected employee can use. If you would like to appoint addresses to multiple users at once, open the main tabs 'Cost centres’ and 'Cost types’ and click on the three blue dots behind the cost centre/type. Then select 'Assign' and add the desired users.

Allocate budget and approval conditions - Click on the three blue dots behind a username and select 'Administrate'. In the sub tab 'Approval rules' you can define whether orders should be always approved manually or automatically, according to a certain budget per article, order, month, quarter or year. In case of manual approval or if your budget is exceeded, the next highest positioned user receives the order request by e-mail so they can approve or reject it.

Allow addresses, cost centres/types and users to be added - Click on the three blue dots behind a username and select 'Administrate'. In the sub tab 'Rights' you can define which additional rights users get.

Declare goods receipt (at a central reception location) - Click on the three blue dots behind a username and select 'Administrate'. Open the sub tab 'Rights' and tick the box for 'Declare goods receipt' and press 'Save'. The user will now see all orders in their order archive. The user can confirm the goods receipt and automatically informs the accounting department and the purchaser.

Assign views - Click on the three blue dots behind a username and select 'Administrate'. Open the sub tab 'Views' and select the ‘View’ you would like the user to be authorised for

Manage orders

Approve / disapprove purchase requests - Log on to My Mercateo and select the tab 'Purchase order requests'. Before you approve an order request, you can click on 'Edit' to change the delivery address, purchase order number and cost centre/type. If you reject an order request, you can state the reason in the comments field.

The requester will automatically receive a message about the approval, any changes or if their order is rejected. If an order is rejected, the requester can click on 'Modify order request' in the rejection e-mail and correct the order request so that it can enter the approval process again.

Purchase order requests in case of absence - In case of illness or extended leave, you can add a representative who can handle/approve purchase requests in your place. To do so, click on 'Set up absence management’ and select the desired user. The selected representative will be informed automatically.

You can remove a replacement by clicking on 'End absence management'. The user will not be informed by the system.

Purchase requests lower in the hierarchy - Order requests that await approval from a user further down the procurement hierarchy can also be seen, edited, approved and rejected. This is useful in case of unexpected absence of the original approver. Move the cursor over the 'i' to see the approver. The requester will receive updates on your actions for their order requests by e-mail.

Hierarchy for approving purchase requests - It is possible to assign per user whether orders are always approved manually or automatically according to a certain budget. If you have multiple users in the hierarchy, you are the budget holder for their orders. If these orders exceed your budget, they will automatically be sent to the next highest positioned user, who again has maximum responsibility for the budget. It is therefore possible that a single order request has to be handled by several approvers.

Log on to My Mercateo and select the tab 'Order archive’ to see an overview of all orders. You can confirm the goods receipt for these orders by clicking on the green button in the 'Action' column. Select the relevant items and click 'Confirm goods receipt'. If you specified a different e-mail address for receiving invoices, your bookkeeping will now automatically receive a goods receipt report.

You can authorise users to book the goods receipt for all orders by clicking on the three blue dots behind the username. Select 'Administrate' and open the sub tab ‘Rights’. Tick the box for ‘Declare goods receipt’ and press ‘Save’. The user wil now see all orders in their order archive. The user can confirm the goods receipt and automatically informs the accounting department and the purchaser.

Please note -Your bookkeeping will only receive a goods receipt report if you specified a different e-mail address for receiving invoices.

Your order history can be analysed in My Mercateo under the tab 'Order archive’. Here you will see an overview of all the orders you have placed yourself (Single User) or which have been placed by other users below you in the purchasing hierarchy (Multi User). You can export the Order Archive as an XLS or a CSV file in order to analyse all your organisation's orders based on product groups, cost centres and buyers/users. To do so, click on 'Export order archive'. Select your time period (max. 1 year) and click on 'Export'. The Excel file with your order history will open automatically.

FAQs

Only the users themselves can see the personal information they have entered on their profile. The information you provide to Mercateo will be treated confidentially and will not be made available to third parties.

On the login page of your My Mercateo account, click on 'Forgot login’. Enter your e-mail address on the next page. Click 'Submit' and you will receive an email with your username and a link to reset your password.

Some features are only visible to the administrator of the account. They can manually make some features visible for the rest of the users.